WordPress to Webflow: A Beginner’s Step-by-Step Guide to Website Migration
Migrating from WordPress to Webflow can seem daunting and tedious, but with the right steps and guidance, you can smoothly make the transition. This guide is designed to help beginners understand how to migrate their website from WordPress to Webflow in a simple and effective manner. We will cover every step, from preparing your WordPress site for migration to setting up your new site in Webflow. By the end of this article, you will have a clear understanding of how to convert WordPress to Webflow and make the most of Webflow’s powerful design tools.
Why Migrate from WordPress to Webflow?
Before we get started with the migration process, it's essential to understand why you might want to migrate from WordPress to Webflow. While WordPress offers a robust content management system (CMS) with a vast array of plugins and themes, Webflow provides a more visual and intuitive design experience. Here are some reasons why you might consider making the switch:
- Visual Design Flexibility: Webflow provides a visual, drag-and-drop editor that allows for more creativity and precision in design without needing to code.
- Built-in Hosting: Webflow offers fast and secure hosting, eliminating the need to find a separate hosting provider.
- No Need for Plugins: Unlike WordPress, which often requires plugins for additional functionality, Webflow includes many of these features out-of-the-box.
- Better Performance: Websites built on Webflow often have better performance and load times due to optimized code and hosting, that can be done in 3 easy steps.
- Code Cleanliness and SEO: Webflow automatically generates clean, semantic HTML, CSS, and JavaScript code, which can help improve your website's SEO and overall performance.
- Integrated CMS and E-commerce: Webflow's CMS is built into the platform, allowing you to create and manage dynamic content like blogs, portfolios, and e-commerce stores without relying on external plugins.
Check out this webflow vs wordpress comparison for more details. If these benefits align with your needs and goals, then Webflow is the perfect choice and it is time to migrate from WordPress to Webflow. Let's break down the process into smaller steps.
Preparing for the Migration
Before you begin the migration, there are a few preparatory steps you should take to ensure a smooth transition.
Backup Your WordPress Site
The first step is to create a backup of your WordPress site. This includes your content, media files, plugins, themes, and database. Backing up ensures that you have a copy of your website in case anything goes wrong during the migration process. There are two ways to backup your WordPress website:
- Manual Backup: You can manually back up your site by exporting your database via phpMyAdmin and downloading your wp-content folder via FTP. This method is more technical but gives you complete control over the backup process. WordPress has a detailed guide on how to perform a manual backup.
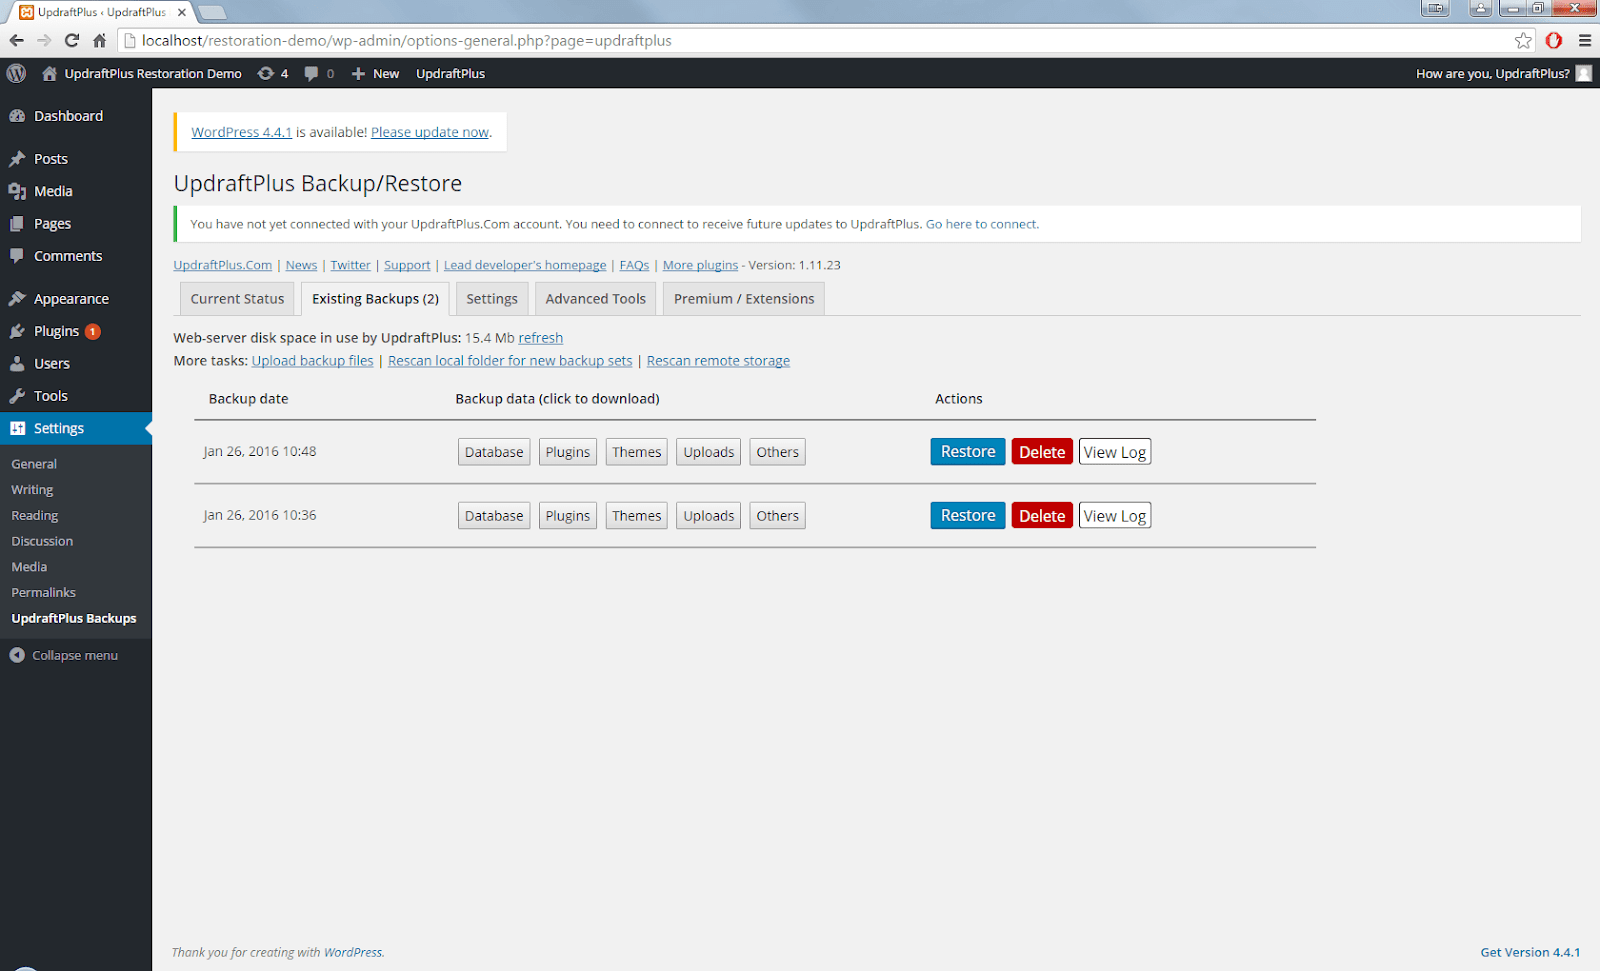
- Using a Plugin: You can use plugins like UpdraftPlus or All-in-One WP Migration to create a full backup of your site. These plugins allow you to create and download a complete backup of your site with just a few clicks.

Photo from Updraft
If you are unsure which backup method may be suitable for you, Jetpack has a list of pros and cons for both methods and you can identify which one is the right fit for you. Generally, manual backup is not recommended as it is time-consuming and error-prone but it might be more suitable in a few situations.
Audit Your Current Content
Perform an audit of your current WordPress site to decide what content you want to migrate to Webflow. This is a good opportunity to clean up any outdated or unnecessary content. Take note of your blog posts, pages, media files, and any custom post types that you want to export to Webflow. This is also a good time to note any URLs that are ranking well in search engines so you can set up proper redirects later.
Choose a Webflow Plan
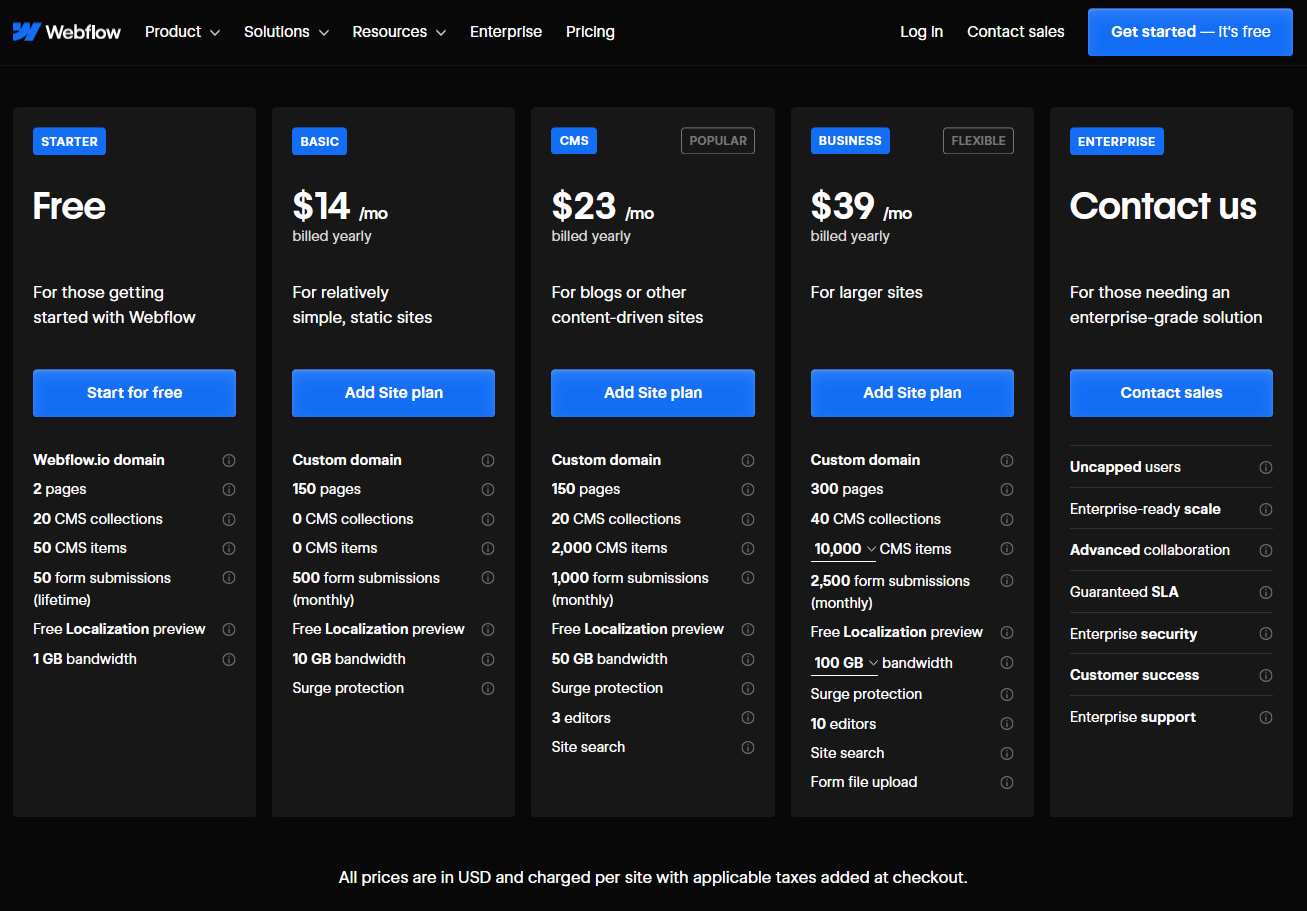
Webflow offers various plans based on your needs. If you're moving a blog or a small website, the CMS plan should suffice. For larger sites or eCommerce capabilities, you might want to look into their Business or eCommerce plans. Ensure you have selected the appropriate plan before starting the migration. Take a look at Webflow pricing and choose the one that best suits your needs.

Photo from Webflow
Step-by-Step WordPress to Webflow Migration
Step 1: Export WordPress Content
To migrate WordPress to Webflow, you first need to export your content from WordPress. This includes your posts, pages, and media files. Here's how to do it:
Export Posts and Pages
- Go to your WordPress dashboard, navigate to 'Tools > Export'.
- Choose the content you want to export. To move everything, select ‘All content’.
- Click ‘Download Export File’. This will download an XML file containing your WordPress content.
Export Media Files
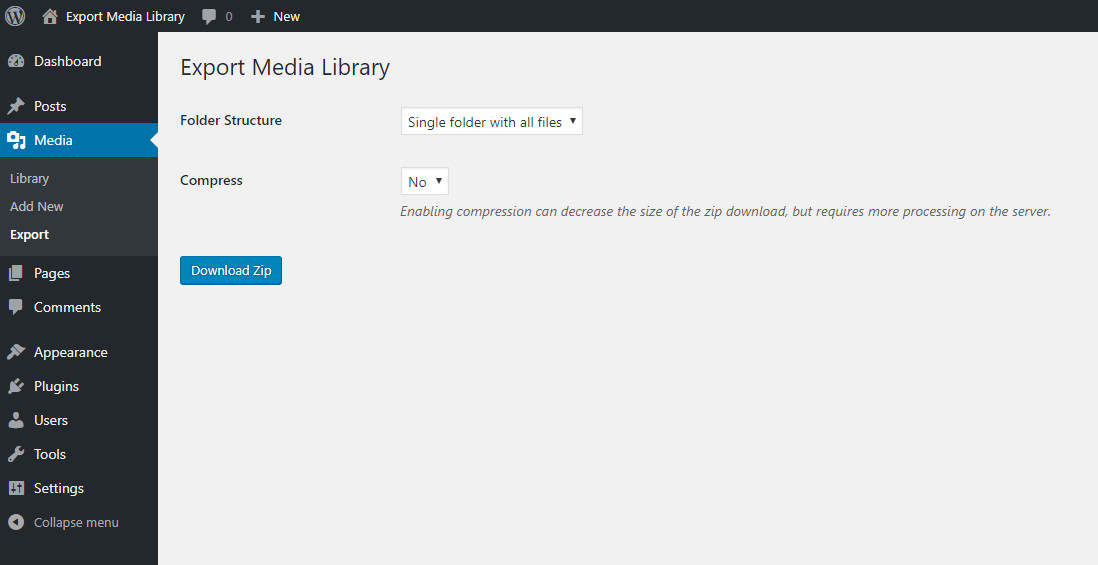
- WordPress does not natively support exporting media files in bulk, so you'll need to use a plugin like Export Media Library.
- Install and activate the plugin, then go to ‘Media > Export Media Library’ to download your media files in a ZIP archive.

Photo from Export Media Library
Step 2: Set Up Your Webflow Project
Next, you'll need to set up your Webflow project where you'll import the content exported from WordPress.
Create a New Project:
- Log in to your Webflow account and click on 'New Project'.
- Choose whether to start with a blank site or use one of Webflow’s templates. If you’re new to Webflow, using a template can speed up the setup process and give you a starting point to build on.

Photo from Webflow
Design Your Layout:
- Use Webflow’s visual editor to design your site layout. This is your opportunity to enhance your website's design. You can recreate the look of your WordPress site or take the opportunity to redesign and improve the user experience.
- Set up the basic elements like the header, footer, and navigation menus. Webflow’s Designer offers advanced layout controls with Flexbox and CSS Grid, allowing for precise layout customization.
Step 3: Import Content to Webflow
Now that your Webflow project is set up, you can start importing your content. The process differs slightly depending on whether you are importing static pages or dynamic content like blog posts.
Import Posts and Pages:
- Webflow provides a CMS Collections feature that allows you to import dynamic content like blog posts.
- Go to the Webflow Designer, and from the left panel, click on 'CMS Collections'.
- Click on 'New Collection' and choose a structure that matches your WordPress content (e.g. Blog Posts)
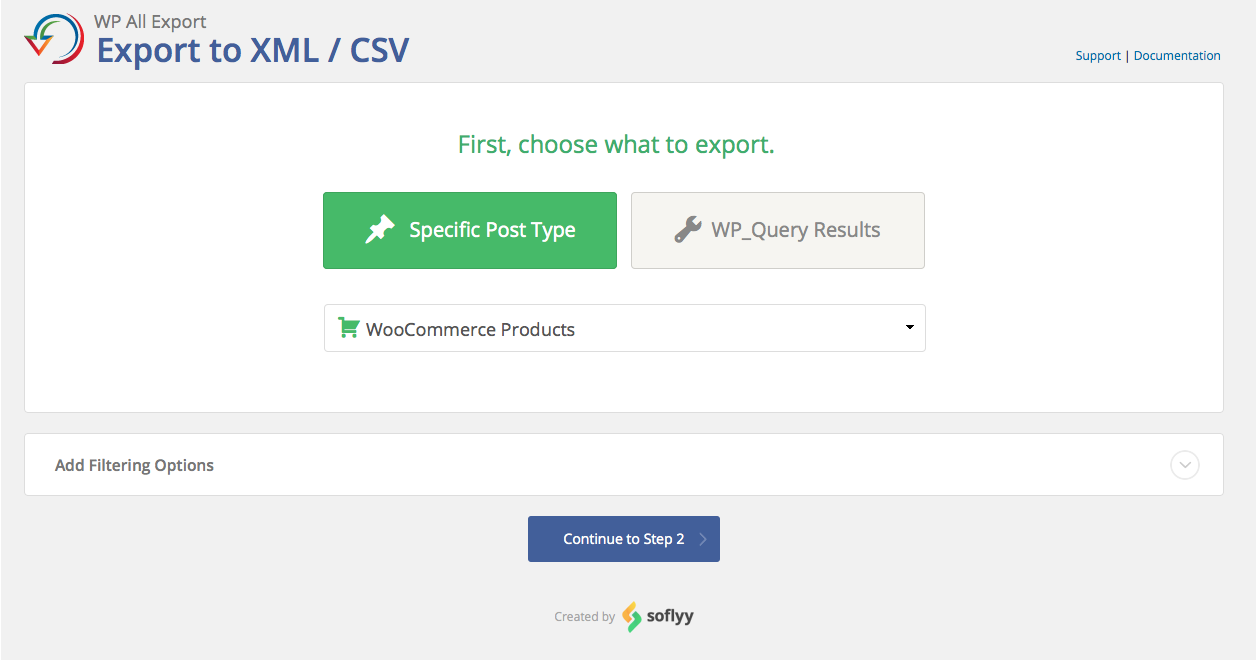
- Use Webflow’s CSV Import feature to import your content. You’ll need to convert your WordPress XML file to a CSV format using a tool like WordPress XML to CSV Converter.
- Once converted, upload the CSV file to Webflow and map the fields accordingly (e.g. post title, body, date, etc.).

Photo from WP All Export
Manually Recreate Static Pages
- For pages like Home, About, and Contact, you will need to manually recreate them in Webflow.
- Use the visual editor to add and style text, images, and other elements. You can copy the content from your WordPress pages and paste it directly into Webflow.
- Use Webflow’s SEO tools to add meta titles, descriptions, and Open Graph tags for each page.
Upload Media Files
- You need to manually upload media files to Webflow.
- Go to the Webflow Designer, and click on the 'Assets' panel.
- Drag and drop your media files into the panel. You can also use Webflow’s Asset Manager to organize your images.
Step 4: Set Up Webflow CMS
Webflow’s CMS allows you to manage your content dynamically. Here’s how to set it up:
Create CMS Collections
- If you have multiple types of content, like blog posts, events, or products, create separate CMS Collections for each.
- For each collection, define fields that correspond to the content you’re migrating (e.g. title, content, image).
Design CMS Templates
- Use Webflow’s visual editor to design your site layout. This is your opportunity to enhance your website's design. You can recreate the look of your WordPress site or take the opportunity to redesign and improve the user experience.
- Bind the design elements (e.g. heading, text block) to CMS fields so that they display the imported content.
Step 5: Redirect URLs and SEO Settings
One crucial part of migrating from WordPress to Webflow is setting up redirects to ensure that your old URLs point to the new ones, maintaining SEO value. Also, you could maintain the same URL structure. For reference,
WordPress: domain.com/blog/post-1
Webflow: domain.com/blog/post-1

Photo by 1981 Digital on Unsplash
Set Up 301 Redirects
- In Webflow, go to 'Site Settings > Publishing > 301 Redirects'.
- Add the old WordPress URLs and the corresponding new Webflow URLs. This will help in preserving your search engine rankings and avoid broken links.
SEO Settings
- Optimize your Webflow pages for SEO by adding meta titles, descriptions, and Open Graph settings.
- In the Webflow Designer, select a page and go to the 'Settings' panel to add these details.
Step 6: Connect Your Domain to Webflow
Once your content is in Webflow and your site design is complete, the final step is to connect your custom domain.
Point Your Domain to Webflow
- Go to 'Project Settings > Hosting' in Webflow.
- Follow Webflow's instructions to update your DNS settings. You’ll need to add CNAME and A records to your domain registrar's DNS settings.
Publish Your Site
- Once the DNS changes propagate, publish your site from Webflow Designer by clicking the 'Publish' button.
- Ensure that everything is working correctly by checking each page and testing links.
Post-Migration Checklist
After migrating from WordPress to Webflow, go through this checklist to ensure everything is in order:
- Check Content Formatting: Review your pages and posts to ensure that the content has been imported and formatted correctly.
- Test Links: Verify that all internal and external links are working correctly.
- Set Up Forms: If you had contact forms on your WordPress site, recreate them using Webflow’s Form block.
- Install Analytics: Add Google Analytics or other tracking scripts to monitor your site's traffic.
- Submit Sitemap: Submit your new sitemap to Google Search Console to help with indexing.
Tips for a Successful WordPress to Webflow Migration
- Plan Your Migration: Proper planning is crucial. Make a checklist of everything you need to move and test before making the switch.
- Test in Staging: Use Webflow's staging environment to test your site before going live.
- Keep SEO in Mind: Pay close attention to SEO elements like redirects, meta tags, and structured data to avoid losing search engine rankings.
- Utilize Webflow University: Webflow offers comprehensive tutorials and guides through Webflow University. Use this resource to familiarize yourself with the platform.

Photo from Webflow University
Conclusion
Migrating from WordPress to Webflow may require some effort, but the end result can be a more visually appealing, responsive, and easier-to-manage website. By following the steps outlined in this guide, you can successfully convert WordPress to Webflow and take advantage of Webflow's powerful design and CMS capabilities.
Remember to plan your migration carefully, back up your WordPress site, and thoroughly test your Webflow site before launching it. With proper execution, your website will not only look great but also perform better in terms of speed and SEO. The work doesn’t end here—post-launch site maintenance is key to keeping your site updated and engaging.
If you're looking for a seamless WordPress-to-Webflow migration, our Webflow design agency - Alien, specializes in helping businesses transition smoothly. Let us handle the heavy lifting while you enjoy a modern, scalable website that drives results.
Ready to make the switch? Contact us today to learn how we can help your business thrive with Webflow!
Subscribe for Industry insights
Get cutting-edge design insights + Free pro
resources just for subscribing!
FAQ
More Insights


Nagar, Vanagaram, Chennai, Tamil
Nadu 600095, India
REGISTERED IN Chennai, INDIA.
"Global Team, Building for the world"


.webp)
.svg)